AutoFlower Quick Start Guide
Are you are new to Autoflowers or have already started growing them? This quick start guide should give you the all the information you need to start a successful and rewarding journey growing these wonderful plants.
If you have not already please visit our homepage to see what we are all about
The Right Information = Less Frustartion
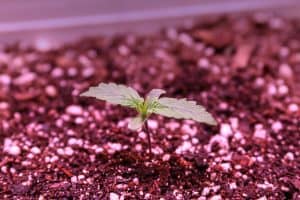
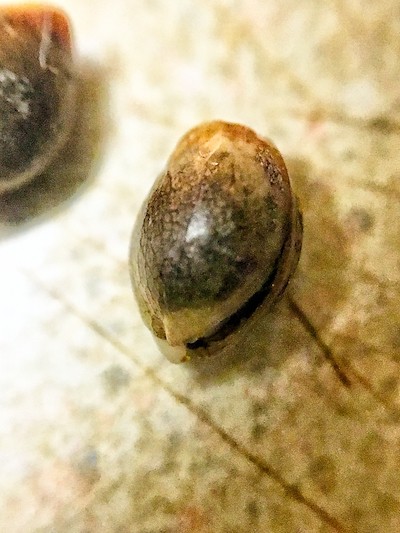
The beginning of a new grow. This is a White Widow AutoFlower from “I Love Growing Marijuana” (ILGM). This picture was taken about 72 hours after I first dropped the seed in water.
Autos are much different to grow than regular plants. You can read all about how they came to be on my All About Autoflowers page
The information here in my quick start guide will give you everything you need to get a good start. Starting with outdoor growing and then moving inside (Where I think most of you are or will be).
I hope you find this really helpful – Enjoy!
Outdoor Quick Start Guide
AutoFlowers do well outdoors and in some cases, depending on where you live and the length of growing season, Autos may be your only viable choice. Up here in the North I don’t have a long enough season to grow regular plants, they just don’t have the time to finish. Not the case with the Autos since they finish much faster.
For the outdoor grower the list of items needed to start is a bit shorter. This is the basic list of supplies needed for outdoor.
- Good Seeds
- Quality Soil
- 5 Gal pots or grow bags
- A decent PH Meter
- Nutrients
- A photographers loop or strong magnifying glass

Quick Start Guide about Quality Seeds
You will have your best chance at success if you begin with good genetics. Not all Auto seeds are created equal and you want to get the best seeds you can to start with. Also, you should begin with a strain that has been around for a while. There are a whole lot of seed banks out there and they may have the same strains but it takes a science based breeding program to produce the most stable genetics.
These are 3 seed banks that I’m comfortable recommending based on past experience.
FastBuds (https://2fast4buds.com/), which is to the left, produces top quality seeds but are bit more expensive.
Nirvana (https://www.nirvanashop.com/) Seeds is another good choice I have never been unhappy
ILGM (https://shop.ilovegrowingmarijuana.com) is another really good choice
You won’t go wrong with any of these. Their shipping is discreet and faster than you might think. And as I said earlier, if you are just beginning pick a strain that has been around for a while. White Widow and Northern Lights are two good choices.
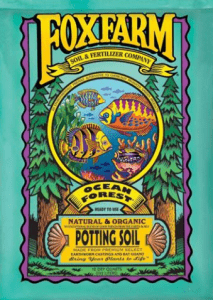
Picking the Proper Potting Soil
The quality and type of soil you choose is a major determining factor to your overall success. The Fox Farm Ocean Forest is a good choice and is popular so it is easy to find. Happy Frog is another popular brand. Another soil I have used is Whitney Farms Organic Raised bed soil.
What these plants need is a good solid organic compost based soil. What is nice about some of the premium soils like Fox Farm is they have additives like worm castings, bat guano etc. These are good natural soil amendments that won’t harm the plants or cause Nute lock (Nutrient Lock)
What these soils Don’t Have in Them is any kind of nutrients added. Don’t use anything like Miracle Grow or any other soils that has any type of fertilizer in it.
I will talk about it more below, but AutoFlowers can not tolerate nutrients the same way that regular plant can. So stay away from treated soils and you will be fine.
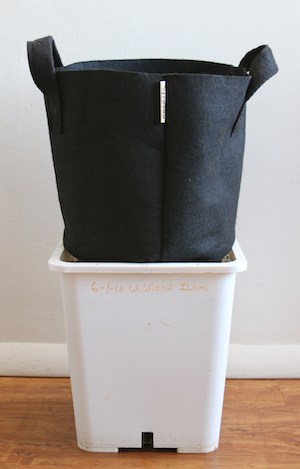
Grow Pots or Grow Bags - It's Your Choice
The type of pots you decide to use for your grows is really a personal choice. I have grown in both. I prefer pots over bags for several reasons. However, I have friends that swear by them so you might what to try them at some point.
In my opinion, grow bags have some disadvantages over pots. The are harder to move around just due to the fact they are soft. If you are growing outside and place grow bags on the ground for long enough (a few days) the roots will start to grow into the ground. I think it is harder to maintain good watering as the evaporation rate is much higher.
Lastly, and I think this is the most important, it is hard to perform LST(Low Stress Training) on your plants. It is so much easier with a hard pot. If you are unfamiliar with LST, not to worry, I cover it further down.
The last decision to make is the size of the pots to use. Since the vast majority of my growing is inside I use 3 gallon pots. However, if you are going to be outside with your plants most of the time then I would suggest 5 gallon pots. Autos do well in 3 gallon pots but you will usually get larger plants from 5 gallons.
Obviously, these two pots to the left need something to do. I’ll plan a side by side grow comparison on one of my next couple grows.
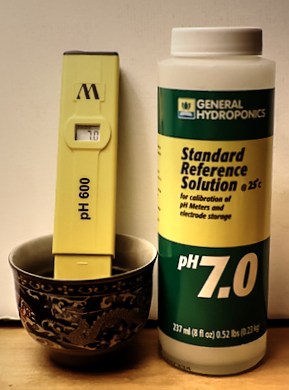
Quick Start Guide on Adjusting PH
It is imperative that you adjust the PH of any fluids that go into the soil. This is much more important with Autoflowers than it is with regular plants.
The only way you can do this is with a PH meter. Do not try to use a PH test kit that has the colored plate, you will not get close to the narrow PH range you need. Believe me, when I first started I tried and I failed. When I bought a digital meter and compared the PH I thought I was at with the placard, against the meter, I was shocked at how far off I was.
However, you don’t need to go out and spend $100 on a meter. The meter I have shown is pretty common. It cost about $25 and though not super high quality, it has lasted for well over a year. I just keep my calibration fluid clode and check it every time prior to watering.
Autos need the PH to be in the 6.3 to 6.5. regular plants can take PH much higher, but if you get too high with an Autofem it will more than likely lock up.
One last little tip. Tap water is fine to use, unless you live in someplace like Flint, Mich. However, don’t assume that every time you turn on the tap, the water will be the same PH, It won’t. During our dry spells where I live the PH of our tap water is pretty much dead on 6.4 PH.
However, during periods when we have a lot of water going into the ground the PH can change drastically. This past spring we had a bigger than normal snow runoff. During the time all that water was pouring out of the mountains the PH of our tap water went up to 8.0.
Never guess with your PH, always check it. It only takes one time to ruin a good grow.
Nutrients are Important but You Need to be Careful
I would not even talk about nutrients in this quick start guide but I do so mosty to caution you.
If you have used a good quality soil to begin with then my suggestion to you is to not give your plants anything except PH adjusted water for the first 2 to 3 weeks. The plants have plenty to work with during that period.
Cannabis Ruderalis gave us the genetics to have a plant that flowers automatically, based on the age of the plant, not on the amount of daylight. However, as with all hybrids that was not all we got. The conditions that C. Ruderalis evolved in were much different than it’s cousins, Sativa and Indica. Because of this the way that Autos react to nutrients is quite different than regular pants. I think it is safe to say that improper feeding is the number one cause of failure when growing Autos.
There are a lot of great products out there made specifically for growing Marijuana, and more popping up on a regular basis. However, up to this point (at least I have not found one) there is not a company that has developed a line and feeding program specifically for Autoflowers.
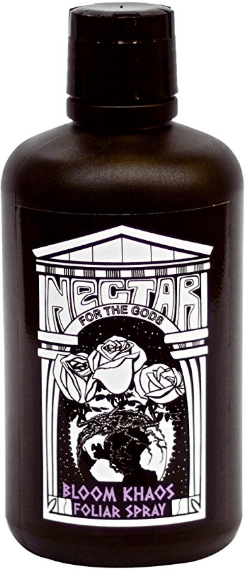
There are however a few companies that make products that work well for our purpose. The line that I personally use is Nectar For The Gods. I have found that with a slight adjustment to their pre tested feeding programs that my plants do quite well.
I go into Nutrition and Feeding in very great detail on my “Nutrition for Autoflowers” page.
My best advice for a beginner, PH adjusted water the first 2 weeks at least. After that you can start to use nutrients sparingly. And you need to get in the habit of really looking at your plants everyday. And I mean really “see” them.
A fun little tip. Nectar of the Gods has a program where they will send you an entire line of their products. And these are not little sample bottles, you get quarts of each of their core nutrients. It is enough for more than a years worth of growing if you are growing 4 or 6 plants at a time.
The best part – All you pay is shipping and you have to fill out an application. This is about $175 worth of nutes if you had to buy them. I paid about $35 for the shipping where I got them.
Just go to – https://www.oregonsonly.com/samples/ and fill out the form.
Ok just for full transparency – I am not endorsed or compensated in any way by any of the companies or the products that I talk about. These are the products that I use in my everyday growing.
Quick Start Guide For The Indoor Growers
If you are already growing indoors then you probably have most of this down. If you are lucky enough to be in a place where you can grow your plants indoors like any other houseplant then lights will be the biggest factor. I will say that even in that situation, I would still be growing in a tent as it is easier to control the environment that the plants are in. I like to have control over as much as I can.
The list below is not complete depending on your situation. However, to get started, this is everything you would need to be up and growing. Especially the first 4 Items on the list
- Good Lights
- Temp and Humidity Meters
- Venting fan (If Needed)
- Grow Tent
- Fan(s)
- humidifier or de-humidifier(If Needed)
You Need Good Lights
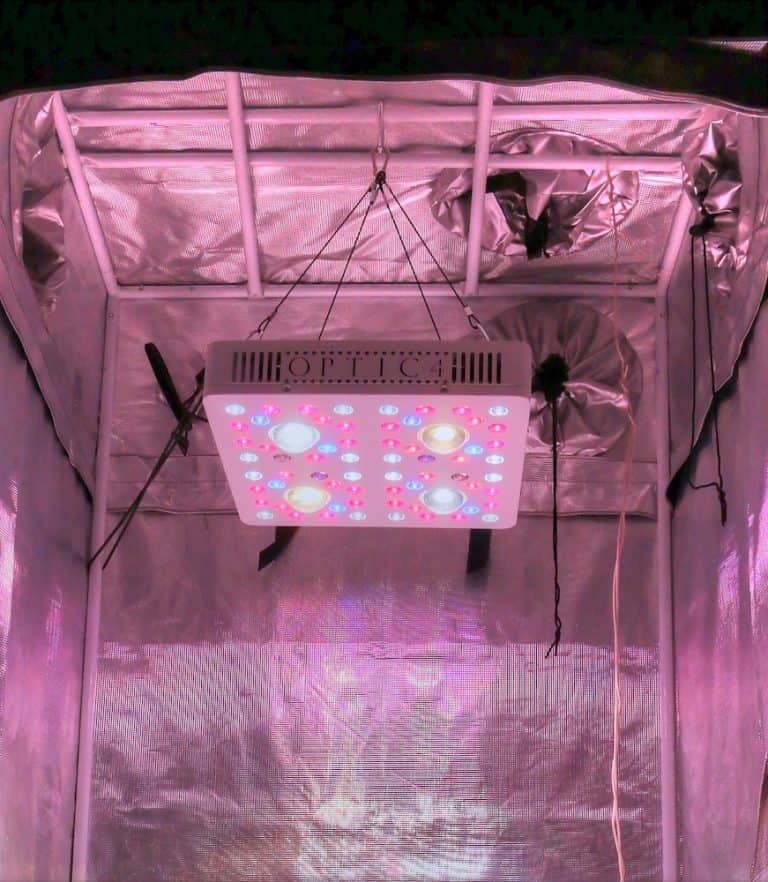
It might seem logical to talk about tents first since that appears to be the main item here. However, it’s not, your lights are. Fortunately for all of us light technology has advanced tremendously especially just in the last 5 years. LEDs have come a long way and are perfect for small scale indoor growing. They use less electricity Than sodiums, mercury, or florescent lights (including CFLs). They generally produce less heat, especially COBs and they cover the light spectrum as well as anything.
However, along with all these new lights, comes a bit of confusion. Not all light are rated the same way some state their output in Watts, some in Lumens and also uMoles. Then we have the spectrum which includes the visible light as well as IR and UV and all of it is important. I cover this topic in great detail on the Lighting Page
My suggestion is to by the best lights you can, even if it is overkill for the tent you end up in. For example if you plan to end up in a 4 X 4 buy a light that is appropriate for a 4 X 4 even if you can only buy a 2 X 2.5 tent. Read reviews and search specifically for things like “lights for a 3X3 grow tent” you will come up with a lot.
Quick Start for Grow Tents
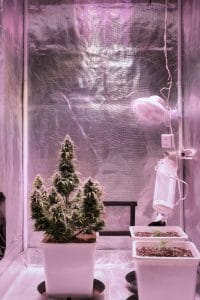
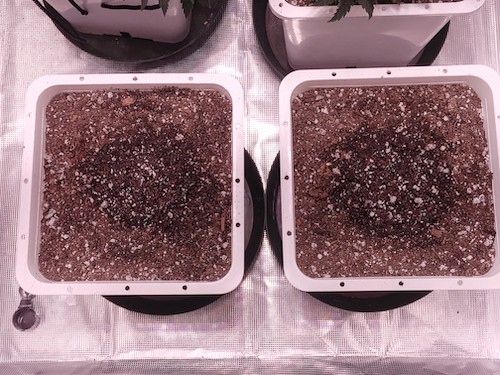
Grow tents come in a variety of shapes and sizes and come from numerous manufactures. From little shorties to tents that look like they are the size of a garage. There are a few things to consider when deciding which tent to start with. Assuming that you took my advice from above and decided on your lights first then you should have an idea of the size you will be choosing. Personally for a smaller indoor grower I think a 3 X 3 foot tent is perfect. This is one of my 3 X 3’s to the left. I moved a couple fans for the shot, buy they are not in the way of the grow when set up. I am using 3 gallon pots and you can see there is plenty of room. I have room for four 5 gallons, However, I use the 3 gallon pots to give me some extra work room in the tent.
With Autos there is no issue with light leakage from the outside. It makes no difference to the plants. However, if you need to be sure that you don’t have light leakage from the inside. then you will be looking at a little higher priced tent. I personally like Gorilla Tents. They are well made, use good zippers and are light tight for the most part. I will say that I have yet to see a tent that did not leak some light somewhere. But that can usually be remedied with a bit of duct tape.
Tents are a personal choice, again I suggest really looking at the review, especially on Amazon, even if you are going to buy elsewhere. Their reviews by buyers are probably the most accurate out there.
The temp and humidity meter is pretty simple. One of the most common is the “Thermo Pro TP-60s ” it is not real expensive less than $25. it has a good wireless range. Comes with the sensor which you put in your tent and then you have the base that you can put in front of you and watch all day.
It also has 3 channels so in case you have more than one tent you just need the sensors and can monitor 3 from the one base station.
You will need at least one and I would suggest 2 for a 3X3, One for a 2X2.5′ and 3 for a 4X4. These do not need to be expensive either. In this case on of the most popular is the “Jardin Monkey Fan Oscillating 20W. This fan runs about $30.
The fans do two things. The most important is it moves the air around in the tent. This is important so the air does not get stagnant. Also, it helps the plants if they get blown around a bit, it makes the branches stronger
This should give you a clear idea of what you need. I realize there a few items I bulleted but have not mentioned yet.
The loop or magnifying glass are really more for the flowering stage when you need to be able to see the trichomes, which is the best way to tell when they are ready to harvest. The loop does a much better job at being able to see the trichomes well.
The magnifying glass, on the other hand, is nice to get a good close look at thing when needed. Since Autoflowers grow fast, they change fast, things can go wrong fast. They are just plain handy. There a couple other items that we will need but they are not much really.
Now that we have all this information, let’s do something with it!
Quick Start Guide for a Beginners Grow
Time to get some seeds in the dirt.
You should have a pretty good idea of what you need to have in hand in order to start. I would recommend being as prepared as possible up front. It will make things go a lot smoother. Another suggestion, keep a journal of your grows. You will have successes and failures and you want to remember both, especially the failures. They are what you learn the most from.
How to Germinate Your Seeds
There are a lot of methods you can use to germinate seeds. It is continual ongoing debate in the growing community.
For the purposes of this quick start guide I am just going to tell you how I do it. I have about a 90% germination rate overall, and that includes some questionable seeds. It is really not that hard you just have to keep an eye on them.
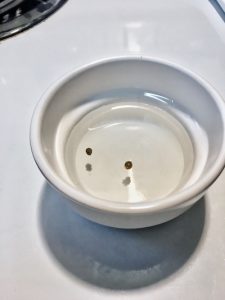
I like to germinate my seed in water. I use tap water PH adjusted to 6.4. I use a small custard cup because it just happens to fit nicely under my computer monitor. Under my monitor is a hard drive that does a great job of keeping the water temp at the desired temperature of 80 degrees. You can use a small glass, it will work fine. Put about an inch of water in it and drop in your seeds. They will float when you first put them in water (At least they should), what you are looking for is for them to sink. Usually, they will sink within 24 hours. Once they sink I pull them out of the water and move them to wet paper towel and I start really watching them with a magnifying glass. You are looking for them to split and start to put out the tap root. Some folks like to let the root grow out a bit, I don’t. the root is very tender and if it is going to grow, I want it growing in soil.
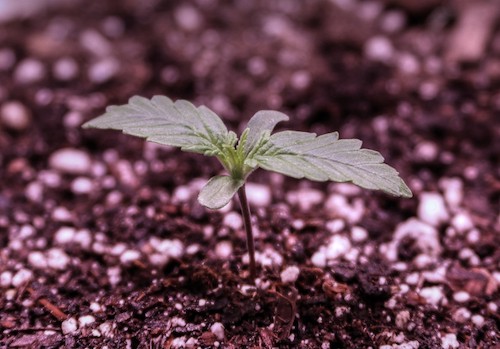
And that is exactly where they are going when they look like the picture to the right.
Quick Side Note
I don’t like to waste seeds and not every seed acts the same.
Occasionally, a seed will sink when you first drop it. Sometimes they don’t sink without a bit of help. Not every seed splits open in 48 to 72 hours. The vast majority of the seeds you will deal will just do their normal thing. But from time to time you will get one that you think is not going to germinate. Regardless of what they have done by 72 hours, I plant them. I find that about half of these end up growing. I say give them a chance even if they don’t seem like they will germinate.
How to plant Your Seeds
I plant directly into the pot that I am going to grow in. Autoflowers have a set lifespan and I don’t like to do anything that might slow them down, even for a few days. As long as you do things correctly, planting directly is the best way to go.
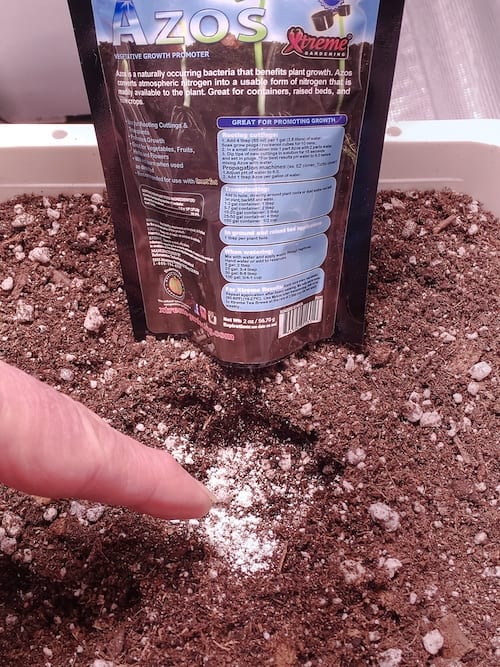
THis is not required but it will give your plants a boost in the beginning. I use a product called Azos, that is short for azospirillum brasilense which is a bacteria that has several benefits. It is a Nitrogen fixing bacteria, which is short means Azos helps the plant absorb more nitrogen is it’s most usable form. Azos also interacts with several other organisms in the soil to release enzymes and hormones that are beneficial to the plants health. You can find it under a lot of brands but the one I like the best is from Extreme Gardening.
Make sure your pots are full enough with soil. It will settle and it is easier it the crown of the plant is not far from the top of the pot. When I am ready to plant the seed I dig about a 3 inch diameter about 4 inches deep and I layer some Azos fill the hole just a little and repeat. I do this until I am up to about 1/2 inch below the surface of the soil. At this point I just drop a bit more Azos in the hole the seed is going in and in goes the seed. Some will show getting the root so it it pointing down. I try to touch the seed a little as possible. So however if goes in the hole is fine with me. This is another advantage of not letting the root grow very much before planting. The root knows which way to go.
Now this next part is important, this is where the spray bottle comes into play. First let talk about water, tab water to be specific. If you are on a municipal water system then you have Chlorine in your water. Germinating your seeds in tap water is one thing. Watering your pants with fresh tap water is another. Chlorine is in the water for one thing, to kill bacteria, that includes the good and the bad. It used to be pretty simple, draw the water, let it sit for 24 hours and you can use it. This is still true if you have chlorine (CL2). However, some public water systems have gone to a product called Chloramine. You can off gas the CL that is in it but you are left with Chloramine. I personally have not dealt with it as we still just use Chlorine here. Normally you can go online and pull the water test results for your water company. They are public record. They are good to have for many reasons, this is just one, to find out what they are using to sanitize the water system.
The quality of water you use is important the more you know about it the better.
You need to mist your newly planted seed and will need to continue to until it is about 4 days old. Good soil is lofty and if you pour the water into the pot when they are seeds and or young plants you can dislodge them in the soil. This will slow their growth. Use aired out tap water or if there are questions about your water, then mineral or spring water is the best. Just adjust it to a PH of 6.3 or 6.4 and mist the soil in that same 3 inch circle you put the Azos in If you used it), the same 3 inch circle to start is fine. You really can’t over water them at this point, however, it is really easy let them get too dry. For the first 5 or 6 days you are going to have to be diligent. I like to start them in my grow tent, it is warm, which is what I want but they also dry out faster. Placing a small opaque plastic cup over the area will help a lot. However, make sure you cut a few holes in it so it can breath. I mist the first thing when I get up again at noon and then mid evening and then right when I go to bed. When mist I really soak the area, I want to ame sure that I get moisture down to where the tap root is going. As you continue to mist, if you really get them wet, then the moisture in the soil will continue to get deeper over the first several days. Once your plant is up, you need to continue to mist for about 4 days. The root grows really fast and by 4 days you can start to water (carefully) with a cup or whatever. Just be easy for the first few days. as you water increase the area that you re watering and the amount. You need that moisture to spear throughout the soil for the roots to grow well. Once the plant is a week or so old then you can start to water the pot fully.
The seed itself as well as the soil should have everything the plant needs for the first 2 to 3 weeks. That si not to say that you can not feed them. However, the nutritional requirements for Autoflowers is a bit different than regular plants This is the main area when new growers to Autos get in trouble.
My suggestion or the first couple grows is to go easy with the nutes. Good PH adjusted water is the most important thing to begin with. For more on the nutritional requirements of Autoflowers, visit this link
I hope you have found this Quick Start Guide useful
This quick start guide should give you pretty much what you need to get started. From here it is about learning and experience, which just comes with time. These are wonderful plants with many advantages. They can just be a bit tricky at times. My first grows were quite honestly not steller. If fact my very first grow (almost embarrassed to say this) I overfed right off the bat. It went into Nute lock when it was about 4″ tall. Yes 4″, ad that is where it stayed. I tried everything I could find (except a good flush) well the old girl flowered and produced me a whopping 4 grams. I’m a bit hardheaded, so instead of thinking, I am never growing another one of these again. I took it more like, ok you little SOB you will not beat me. Amazing what you can learn in a few years and a bunch of grows.
Good luck with your grows!
The Gardener